

[ad_1]
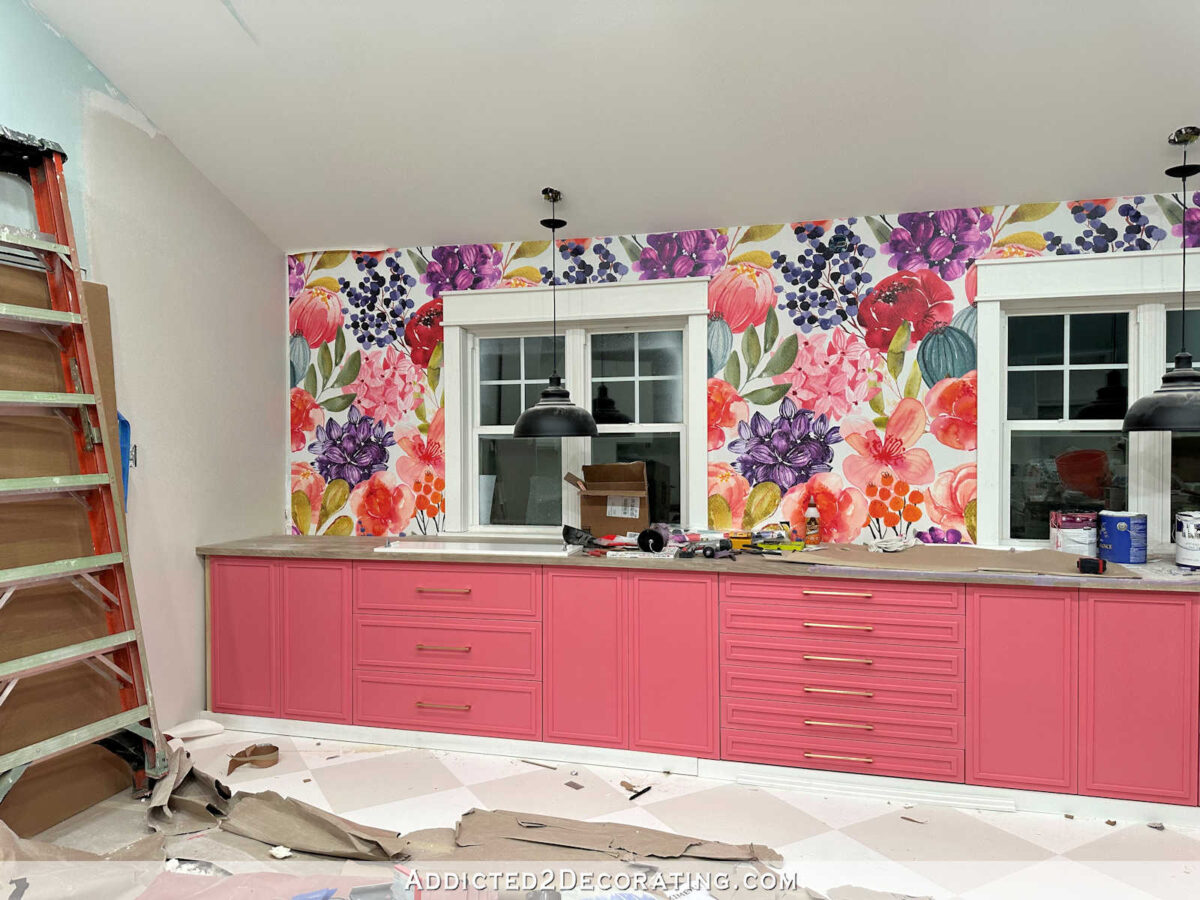
It’s taken a very long time to get up to now, however I lastly have a wall of pink cupboards within the studio! The wall will not be fully completed. I nonetheless have have an extended record of issues that also should be executed (which I’ll element after I present you the painted cupboards). However not less than it is a main step in the direction of getting this wall completed!
And this wall being unfinished gained’t cease me from admiring the wall of decrease pink cupboards as a result of simply getting up to now was this was fairly the feat. It was an extended and drawn out course of, from putting in the cupboards, sanding the doorways and drawer fronts, including trim, caulking, priming and portray.
Nothing about that was notably tough…besides this silly 6-drawer cupboard within the center…

I put the drawers collectively, disassembled them, and reassembled them so many instances I misplaced rely. I used to be convdinced that IKEA’s directions relating to the location of the drawer slides was improper, so I put in them the place I assumed they made sense. They usually appeared fairly good! (The image above was taken after I went rogue, tossed IKEA’s directions on the garbage pile, and did it my very own method.)
However I simply couldn’t go away it alone. I couldn’t stand the thought that they weren’t put collectively in line with the directions. So I disassembled them one final time, and painstakingly went by means of each web page of directions once more.
And I lastly discovered my mistake. I had one way or the other missed that the very backside drawer entrance goes on a special method than the opposite 5. As soon as I made that correction, all the things else went collectively completely. 😀 However I assembled and reassembled so many instances that I’m fairly certain I now qualify as an professional at assembling IKEA Maximera drawers for the Sektion cupboards. I can assemble a Maximera drawer, drawer entrance and all, in about two minutes now. 😀
After I found out that cupboard, all the things else went collectively very simply. Right here’s the way it seems to this point.

Like I mentioned, I nonetheless want to complete the trim on the edges and on the flooring, and the cupboard doorways don’t have door pulls on them but. However have a look at this beautiful coloration!
I actually couldn’t be extra happy with how that is turning out. The colour is totally excellent for me. It’s pink and recent and female with out being too shiny or too princess pink or too Barbie pink.

The colour is from Sherwin Williams (I discovered it at Lowe’s), and it’s referred to as Tuberose. I had it combined in Behr Premium Plus paint in an eggshell end (as a result of I’m at all times at House Depot and Behr is my favourite basic goal paint). After which I topcoated it with Common Finishes Excessive Efficiency Topcoat in a flat end (affiliate hyperlink). I do know a lot of you’ve gotten requested in regards to the portray course of, and I’ll share all of these particulars very quickly. For the entire course of, I used a curler, a brush, and my little sprayer (affiliate hyperlink).

I’m so glad I waited to complete off this wall of cupboards on the backside as a result of I’ve modified my thoughts on how I would like that to be executed. I had initially deliberate on the countertop on this wall to be a typical desk peak (30 inches excessive) with two desk areas and two desk chairs.

After which I made a decision to eradicate the desk areas, put cupboards all the way in which throughout, and use IKEA Sektion cupboards as a substitute of constructing my very own. That meant that the countertop could be greater than 30 inches.

So with out these desk areas, I figured that this 20-foot countertop could be extra of a storage floor the place I’d retailer issues like my stitching machine. What I didn’t rely on is that the brand new peak (about 33 inches) is the proper peak for me to face and work. I’ve already gotten a lot use out of this countertop! Over the previous few days, I’ve used nearly each sq. inch of the 20-foot width of the countertop as a piece floor, and it has been completely wonderful.

So now, as a substitute of including trim to the underside and ending it out like I’d do on a built-in bookcase, I wish to transfer these toes again (the 3-inch-high utilitarian toes that I made and added) about 4 inches and have a toekick like kitchen cupboards have in order that I can stand comfortably at this countertop to work on tasks. I’m going to get a lot use out of this space!! And the truth that I used sizzling glue to connect these toes as a substitute of nails or screws will permit me to make this adjustment very simply even at this late stage.
In all of those footage, the underside trim is sitting in the direction of the entrance (none of that trim is hooked up but) within the place I used to be initially planning. That is how I’d trim out the underside of bookcases and not using a toekick, however not the underside of kitchen cupboards that want a toekick.

So I nonetheless have a number of gadgets on the guidelines that I want to complete earlier than this wall is completed. I type of wish to paint the black pendant lights gold. I like having a bit of little bit of black within the room, however I purchased these years in the past. Now that I’m lastly ending the room, I’m wanting issues to be extra gentle and ethereal and female, and the black appears heavy to me. What do you suppose? Maintain them black? Paint them gold to match the drawer pulls?

I do know I’ve mentioned many instances, however I’ll say it once more. I completely LOVE these IKEA Sektion cupboards. The 2 sections which have three drawer fronts even have 4 drawers. There’s a fourth drawer hidden behind that high drawer entrance.

And all the drawers include little plastic items that cowl these areas on the edges of the drawer packing containers that don’t look so fairly proper now. That’s the place the screws are that you simply use to do the advantageous changes on the drawer fronts (shifting them left and proper, or up and down). As quickly as all of my changes are executed, and all the things is completely spaced, I’ll pop these covers on and it’ll look way more completed.
And I’m completely giddy about this center part with the six shallow drawers. These shall be excellent for organizing artwork pens and pencils, pads of watercolor and yupo paper, stitching gadgets and spools of thread, and a lot extra.

I really feel like I may sit in right here and simply stare at this wall all day. 😀 And it’s not even completed but! However that mural and the cupboard coloration make me so blissful.
So what nonetheless must be executed on this wall? There are fairly a number of issues!
- End the countertop (i.e., the 2 lacking items within the again corners),
- Set up the toe kick, paint and clear coat,
- Set up the aspect trim on the cupboards, paint and clear coat,
- End the aspect strips on the mural and end trimming the mural,
- Set up the knobs on the doorways,
- End wiring the retailers (three to go) inside the cupboards,
- Set up the countertop grommet retailers,
- Add the cabinets inside the cupboards,
- Wooden fill, sand, caulk, prime, and paint the window trim,
- Paint the pendant lights (possibly),
- Clear the home windows,
- Set up the window shades.
And that’s only one wall. 😀 Then I’ve three extra partitions, a again entry, a toilet, and a storage closet to complete. It’s a very huge room! At the very least I’m to a degree the place I can truly see some fairly important progress and I now not really feel like I’m caught within the film Groundhog Day, so I’m feeling extra motivated with every passing day.
I’ll go away you with yet one more look. (And please notice that the lights aren’t even put in proper now. They’re actually hanging by the wires. I needed to undo them to color the ceiling, however as soon as they’re put in, they’ll be raised not less than six inches, as you may see by the location of the cover. And the ultimate peak shall be decided after they’re correctly put in, and shall be based mostly on my peak and the place they work greatest for me.)

Addicted 2 Adorning is the place I share my DIY and adorning journey as I transform and beautify the 1948 fixer higher that my husband, Matt, and I purchased in 2013. Matt has M.S. and is unable to do bodily work, so I do the vast majority of the work on the home on my own. You possibly can be taught extra about me right here.
[ad_2]