
[ad_1]
A giant stunning pergola will fully rework your patio and outside area. See learn how to construct a pergola from strong wooden over an present concrete patio.
Want so as to add a patio to your DIY pergola? Discover ways to prep and pour your personal concrete patio right here. Plus, see 3 totally different pergola designs: conventional deck pergola, trendy deck pergola, and round pergola for swings.

As we speak I’m going to point out you learn how to construct a timber pergola over an present concrete patio. I constructed this for a shopper that needed to enhance their yard patio to have a nicer area for household gatherings.
Get the total woodworking plans to construct this pergola right here within the store, and watch the video of the construct right here on our YouTube channel.
Massive DIY Pergola Design
This shopper needed a big pergola design just like what a member of the family had, so I took some measurements and adjusted the model to suit the scale of their patio.

The completed pergola measures 20’ W x 13’-2” D x 11’ H. As designed, this offers over 200 sq. ft of protection, together with over 9 ft of head area (to the rafters).
This DIY pergola plan options robust 8×8 posts and thick stacked beams and rafters for a extremely spectacular and durable pergola body. We additionally added a prime layer of shade runners which filter the daylight very nice to offer shade beneath the pergola.
Because of their home format, I needed to transfer one of many posts to not block the laundry window. The plans within the store are symmetrical as proven and, as all the time, the premium plans embody all of the detailed dimensions and diagrams to make your venture a hit!
Earlier than you start constructing, you should definitely test your native planning and zoning ordinances or the native council. As a result of this was greater than 200 sq. ft, I wanted to submit building drawings to town to get it authorized and get a constructing allow. A few week later after approval, I used to be capable of begin building. Approval occasions might fluctuate.
This publish accommodates affiliate hyperlinks. Study extra and browse our full disclosure coverage right here.
DIY Pergola Supplies
Tough sawn timber is a superb possibility for a big outside construction like this pergola. However what’s tough sawn timber?
Tough sawn timber is lumber that hasn’t been completed and handled. This offers you the liberty to complete and deal with the lumber the way you need, and it offers an incredible rustic contact to an outside venture like this.
Your native lumberyard is a superb place to start out and so they can level you in the proper path in the event that they don’t inventory tough sawn boards within the sizes you want.
Similar to with common lumber, you’ll buy primarily based on the nominal dimension of the timber (equivalent to 8×8) however the completed dimensions can be barely totally different. With conventional sawn lumber, an 8×8 has been completed to 7 1/2″ sq.. A tough minimize 8×8 publish, nonetheless, can be minimize at 8″ and never planed to the smaller completed dimensions.

Lumber Wanted
- Posts: (8) 8X8-12′ Tough Minimize Cedar
- Quick beams: (2) 4X10-16′ Tough Minimize Douglas Fir
- Lengthy beams + diagonal braces: (4) 4X10-20′ Tough Minimize Douglas Fir
- Rafters and base trim: (21) 2X8-16′ Tough Minimize Douglas Fir
- Shade runners: (28) 2X4-12′ Tough Minimize Douglas Fir
- Short-term braces: (16) 2X4-10’
Footings
- (20) 80 lb luggage of Sakrete Grey Concrete Combine
- (3) 10’ #4 Rebar (there can be further)
{Hardware} and Fasteners
- (8) Simpson Robust-Tie CPTZ ZMAX Galvanized Hid Put up Base for 8×8 Nominal Lumber
- (16) Titan HD ½” x 6 in. Mechanically Galvanized Heavy-Responsibility Screw (For publish base)
- (1) Field 5” SDWS Timber Screw – (Qty 50) (For tops of posts)
- (3) Packing containers TimberLOK 10 in. Structural Wooden Screw (12 Pack)
- (1) Field 3 ½” Deck Screws (For beams, rafters, shade runners and base trim)
Extra Provides Wanted
- Rent or lease a Concrete Coring Rig (it was about $100 per gap to rent it out)
- DAP Wooden Glue (glue any cracked wooden)
- DAP Wooden Patch (Caulk any cracks earlier than staining)
- (12) Gallons of Wooden Stain – I used Woodscapes by Sherwin Williams within the shade Spicewood
- (1) Simpson Robust-Tie SET-3G 22 oz. Excessive-Power Epoxy Adhesive with Nozzle and Extension
- DIA Drop-In Internally Threaded Anchor for 1/2-in. Rod (20-Pack)
- ½” x 2 ½” Bolt
- ½” x 3 ½” Bolt
- ½” Washer
Instruments Wanted
Value Abstract
The supplies and provides for this large stunning pergola price round $6700.
- $5000 for the lumber
- $800 for the {hardware} and concrete
- $900 for the stain
This isn’t the least costly pergola possibility, however you possibly can’t beat the big custom-fit dimension and the truth that it’s strong wooden. (Most pre-made pergola kits are a max of 8 ft tall and use hole posts to save lots of on timber prices and delivery weight.)
Step-by-Step: How you can Construct A Pergola
Watch the step-by-step video, get the detailed woodworking plans right here, and browse the directions beneath to learn to construct a strong wooden DI pergola over a concrete patio.
Step 1: Lay Out and Pour Footings
I used to be constructing the pergola over an present patio, however the house owners might exchange the patio in a couple of years, so reasonably than securing the pergola to the present patio, we minimize out holes within the patio and poured new footings. (This can be a good thought for a venture this massive, anyway.)
BEFORE YOU DIG: Name 811 to have the utilities marked. Don’t dig till you understand the place the traces are!
Mark Footing Places
Observe the diagram within the woodworking plans to mark the middle factors of the footings.
I began by laying out the middle factors of the pergola posts utilizing the again nook of the home as a reference line to maintain all the pieces sq. and plumb.
Tip: Use the 3-4-5 rule to ensure the nook publish middle factors are in the proper spot. Use your tape measure to measure out on 3 ft from the nook a technique and 4 ft from the nook the opposite means, and, if it’s sq., while you measure the 2 markings at a diagonal the space can be 5 ft. (Bear in mind the Pythagorean theorem? 🤓)
Minimize Concrete Slab (If Wanted)
If wanted, minimize the concrete slab to make means for the brand new footings.
I employed this out — the speed in my space for labor and hiring the concrete core drill was $100 per gap. Due to my buddy Sam (sure, the identical man who allow us to present you all about in-ground trampoline installs) we had been carried out fairly fast and the cuts the place good an clear

As soon as the concrete is minimize, you’ll need to filter out the cores. I used a hammer drill to interrupt it up into a couple of items to assist with removing.
Dig Put up Holes & Prep
Dig out the publish holes. I used to be planning to lease an auger however fortunately the soil was tender sufficient that it was simple to dig every gap by hand in about half-hour with a publish gap digger and a shovel.

Dig to the proper width and depth – 8″-9″ broad by 30″ deep for the frost line my space (which was really 34″ to account for the prevailing patio).
The native codes additionally required there to be a minimum of one #4 rebar 28” size to be centered within the footing 3” above the bottom. So we would have liked to droop the rebar within the middle of the footing like this to satisfy that requirement.
How deep ought to an anchor be for a pergola publish?
The footing/anchor depth wanted varies by construction and site. There are two common guidelines to remember
- Anchor the pergola at 1/3 the peak of the publish. That is most relevant in case you are setting the publish straight into the opening in concrete, reasonably than utilizing a bracket like I did.
- Dig your holes a minimum of 12″ beneath the frost line. This may forestall heaving and maintain the posts plumb and safe. You could find your native frost line depth by simply looking out “frost line” together with your zip code.
Go Inspection (If Wanted)
If wanted, have the inspector approve the footing format and holes. I needed to clear some underground particles that was blocking the opening and have the inspector come again.
Pour Footings
Every gap required about 2.5 of the 80lb concrete luggage and about half-hour to pour. This can be a nice time to seize a buddy or rent assist!
PRO Tip for a clear concrete pour
Minimize a big gap (to match the footing width) in a scrap piece of plywood or particle board. Lay the board over the opening as you pour — this can maintain any concrete from splattering or spilling in your present concrete.
You’ll want to degree the highest and produce the “cream” to the highest with a trowel. Let the concrete set and remedy a couple of days.
Concrete “cream” is prime layer of concrete that’s main smoother cement with no gravel combination seen. Bringing it to the highest offers you a very nice trying end and helps the floor energy.
Step 2: Put together and Stain Lumber
Whereas the concrete footings are curing, it’s a very good time to prep and stain the lumber, starting with the posts.
Stain All Elements
I stained all of the timbers with two coats of exterior wooden stain. I selected Woodscapes by Sherwin-Williams in a darkish brown shade known as Spicewood.
Earlier than staining, be certain that the wooden is dry and mud free. Patch any chipped wooden with wooden glue, and sweep the wooden nicely earlier than staining – use a thick 3/4″nap “shaggy” curler.

It took a couple of gallon and a half for the 7 posts with two coats every and about 6 hours of portray rolling and brushing. Plus extra time later for the beams and different elements! I minimize the items as I constructed, so I stained them as wanted within the course of.
The stain dried actually quick within the solar on sawhorses. Be sure your noticed horses are actually robust to carry the load of the posts.
Prep Posts
With a purpose to match the hid publish bracket bases, every 8×8 publish must have a vertical slot minimize within the backside (for the fin) and three holes (for the metallic pin dowels) drilled by the perimeters. Verify the producer specs to your particular brackets.
I minimize the slot for the fin, then marked the holes for the pin dowels and set the posts within the brackets to double test and effective tune the situation of the holes earlier than drilling.

Step 3: Set up Put up Anchors
After the concrete footing has cured a couple of days, you possibly can set up the publish anchor base brackets.
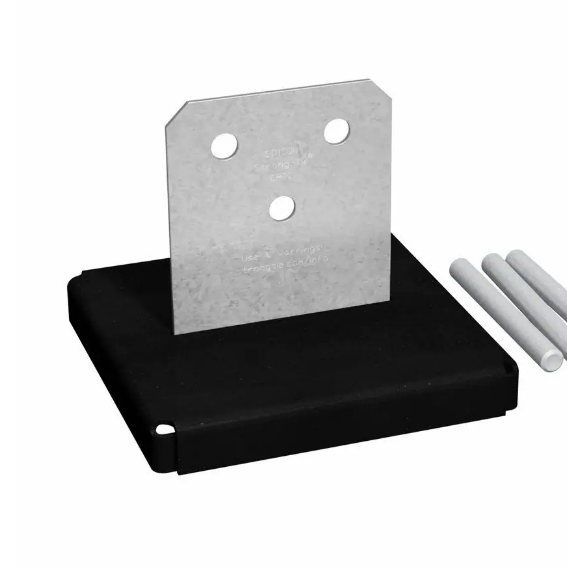
About This Hid Put up Base
I made a decision to make use of the Simpson Robust Tie Hid Put up Base. These publish bases are put in by drilling into the concrete footing after it’s cured, versus putting the publish bracket within the moist concrete earlier than it cures. I like this selection as a result of it offers me extra management over the ultimate location since there’s much less time crunch.
The factor that I like about this base is that it seems nice AND it elevates the publish off the bottom an inch from the concrete. This may maintain the publish from wicking up moisture, so the posts will final a very long time with that further safety from rot.
Mark Bracket Places and Drill Holes
To put in these base publish brackets, I discovered it’s greatest to first mark out the place the brackets can be anchored down, and have them leveled and prepared. I oriented all of them the identical path with the fin perpendicular to the home. This was going to make it simpler to degree the publish in a single path.

I waited a couple of days for the footings to remedy, then I drilled with a hammer drill (2) ½” holes at 6” deep on prime of every footing. Then I cleaned out the opening with a wire pipe cleaner I connected to my drill and an air compressor. You wish to clear it out the opening as greatest as you possibly can earlier than the subsequent step.
Connect Brackets with Epoxy and Bolts
Subsequent I crammed the opening midway with a two half epoxy. When you open the epoxy and it will get combined it’s worthwhile to use it rapidly. How do I do know? Properly, I wasn’t fairly prepared and didn’t have a strong sufficient drill for the bolts so I wasted a complete tube of epoxy and an hour making an attempt to borrow the proper instruments.
After you have the epoxy within the holes, connect the 6” bolts and ensure the bracket is degree. There was one gap on the bracket I needed to make wider to ensure that the bracket to sit down sq. with the home. It was good to have just a little little bit of wiggle room in case your holes will not be drilled within the good spot.
Step 4: Set up Posts
Putting in the pergola posts is an enormous job, so it helps to have a helper or two round. You’ll want to use the 2x4s as bracing to maintain the posts safe and maintain you (and your helpers) protected.
Drill Put up Attachment Holes
With a purpose to be certain that the posts had been degree with the assorted slopes of the patio, I waited to drill the horizontal holes for the pin dowels till I might place the posts on the brackets. This allowed me to set the publish degree and effective tune the opening places.
I used an extended ⅝”spade bit to drill out the holes and solely drilled by 75% of the wooden base to set the pins in.

Connect Posts to Brackets
There are three pins to anchor the publish to the bottom and the footing.

After the pins are set use plastic shims to do the ultimate leveling of the publish.
Minimize Posts to Stage
Measure one publish’s size, then rigorously minimize off the additional with a chainsaw.
From the primary publish, then use a string and bubble degree to mark the remainder of the posts degree and trim them to size.

Word that for this design, the 4 nook posts are shorter (to carry the shorter aspect beams) and the 4 middle posts are taller (to carry the longer beams).
Notch Posts for Beams
Within the prime of every publish, use the chainsaw to chop out a 5 inch deep notch a bit wider than the beam. Stain all of the notches earlier than putting in the beams.

Step 5: Set up Beams
Minimize the Beam Ends
I minimize the ends of the beams with a easy 45 diploma minimize half means down the top of the beam. If you happen to desire a unique model, you may around the ends like on our backyard arbor wedding ceremony arch or minimize a curve like the gothic arch arbor. (On the two″ rafters, you need to use a jigsaw, however to around the 4″ beams you’ll want to make use of a band noticed or a chainsaw.)

Stain after slicing the beam ends.
Place and Connect The Beams
After the stain has dried, place the beams on prime of the posts. Set up the two shorter aspect beams, then the lengthy beams on prime of these.
As soon as the beams are sq. to the publish, connect the beams with two 5” timber screws on either side of every publish.

Step 6: Set up Diagonal Helps
Earlier than putting in the rafters, it’s worthwhile to prep and set up the diagonal assist brackets.
Minimize the Helps
Minimize 8 diagonal helps from the 4×10 timber and stain them. The printable woodworking plan contains the precise dimensions.
Set up the Brackets
Clamp a block of wooden on the backside of the bracket to the publish to carry the bracket whereas screwing it in place. You could possibly connect the bracket a number of methods. I pre drilled a 1⁄2” broad countersunk gap, then drilled in two 10” lengthy lag screws on prime and two on the underside. Drilling them in at a slight angle into the highest beam or publish helps them match securely.

Step 7: Set up Rafters (Crossbeams)
As soon as the helps are put in, the construction can be far more steady to put in the rafters on prime of the beams. I’ll name them rafters right here however they’re usually known as crossbeams as nicely.
You may take away a few of the 2×4 braces to provide room for the ladder you’ll want to put in the rafters. (You’ll want to patch any holes left from bracing.)
Minimize Rafter Ends
For the rafters, I minimize the ends precisely just like the beams with a easy diagonal minimize at every finish. (Once more, you are able to do a ornamental rounded finish like this or minimize a basic curve like this as a substitute.) Stain earlier than putting in.
Decide Rafter Placement
Offset the primary rafter 3 ½” from the top of the beam on either side of the pergola, then measure to the middle of the pergola and divide up the area equally. Mine are about 9 ⅝” aside.

Connect Rafters
Connect every rafter to the highest of the beam with 3 ½” deck screws at an angle into the beam.
Tip: Arrange a string alongside the entrance of the pergola for every finish of the rafters to have a reference line to maintain them straight.
Step 8: Set up Shade Runners (Purlins)
You may depart the pergola with simply the rafters should you desire. I just like the added shade and stability from the additional layer of shade runners (additionally known as purlins). Some folks like so as to add a trellis to 1 aspect and use the runners as an extension trellis for the climbing crops or vines, too.
Decide Runner Placement
Much like the method of the rafters, connect one runner on the entrance and one on the again, then calculate the space between boards to maintain them evenly spaced.
The size of my runners put the ends of the primary board on prime of the middle of a rafter, so I didn’t have to chop the primary half of the runners to size. This additionally hid the seams of the shade runners above, which was good!

Connect the Runners
Use deck screws to connect the runners to the rafters. Connect the primary set, then connect the second set (to span the total size of the pergola) and minimize them to size.
Don’t overlook to stain the newly minimize runner ends!
Step 9: Wrap Posts with Base Trim
I just like the basic look of a straight publish, however the slits and holes from the bracket attachment would have taken loads of work to make it look seamless. So, I made a decision to trim the bottom of the publish utilizing the additional rafter scraps.
Set up (Removeable) Trim
Simply in case the publish bracket or the publish wants consideration sooner or later, I needed to make the trim simple to take away.
Connect 3 of the mitered items collectively and slide them over the bottom of the posts. Slide within the final mitered piece and connect it to the publish and the opposite items of trim. Caulk the sides and stain over the caulk.

Step 10: End Work
This final step is what makes the distinction between “I did it myself…” and “You probably did THAT your self?!” The small print make a distinction!
Take away any remaining bracing, then patch any holes. Caulk any cracks on the posts (or seen cracks elsewhere). Contact up the stain the place you’ve caulked or wherever else it wants it.
Including Lights & Irrigated Planters to the DIY Pergola
I completed up this job by including string lights and self-watering planters which are a part of the drip watering system connected to the adjoining drip sprinkler system.

The landscaper was capable of get a humorous pipe in place within the gap subsequent to the grass, so I might tie into the drip irrigation that was going to water hanging backets and pots across the pergola. That was nice timing to get that in. Now they don’t need to have a hose over the patio to water the crops. (See what I imply within the video right here.)
The lights are connected on to the pergola rafters with screws by the little mounting holes on the sunshine string. This required 2x 50-foot (?) strands of lights to make 5 rows of sunshine.
The pergola lights are plugged in to a 30-foot extension twine connected to the pergola, so they simply need to plug within the lights to get pleasure from them. (This strand of good lights could be an excellent cool improve, although!)
Listed below are another pergola lighting concepts and planter choices we like:
The house owners additionally added an outside furnishings entertaining set from Costco to make the area superb.
This DIY pergola seems superb and it makes the yard appear even greater — they’re utilizing it each night time to hang around and revel in!
Customized DIY Pergola FAQs
Can a newbie construct this pergola?
Due to the additional work and precision cuts required to construct this DIY pergola, I’d advocate getting a couple of greater initiatives beneath your belt earlier than constructing — and a few expertise slicing with a chainsaw!
For a newbie DIY pergola, our trendy deck pergola is a superb possibility.

How lengthy does it take to construct a pergola myself?
I spent the higher a part of 3 weeks working most days to construct this LARGE pergola. Pouring the footings and marking the boards was probably the most time-consuming half, however you possibly can’t skip it!
If you’re constructing a smaller pergola, the staining gained’t take as lengthy. If you’re attaching a pergola to a deck like this, the time can be much less because you don’t need to dig holes and watch for concrete to set. I constructed our smaller trendy deck pergola in lower than every week of labor.
How a lot does a {custom} wooden pergola price?
Constructing this LARGE 20’x13′ pergola price about $6900 in supplies and about 3x or extra of that in labor (together with the design). Native charges will fluctuate for each supplies and labor. Keep in mind that while you rent out the work, you’ll be hiring a minimum of a few craftsmen, and presumably a small crew of laborers, for a lot of days of labor. Search for a contractor with related expertise who’s licensed and insured.

Is it cheaper to construct a pergola from scratch or purchase a package?
A pergola package will typically price lower than constructing a {custom} pergola from scratch — BUT you don’t get the identical high quality of lumber and also you’re restricted by the scale of the pergola kits in the marketplace.
Wooden pergola kits, particularly the extra reasonably priced ones, are sometimes restricted in peak to round 8 ft. This protects cash since 8 foot posts are inexpensive than 12 foot posts minimize to dimension, however you don’t get the identical head clearance and spacious feeling.
Probably the most reasonably priced pergola kits are additionally normally restricted to 10-12 ft, with the 20 foot pergola kits going up in worth (and infrequently in supply charges, too).
Pergola package posts are additionally generally hole as a substitute of strong wooden, in order that they gained’t final as lengthy or be as robust. Usually the wooden used is a inexpensive wooden or an engineered wooden reasonably than strong timber — this may be a bonus relying on what you need, although.
The beams, rafters, and helps, are additionally sometimes smaller than I used right here, which implies they’re lighter to ship and simpler for a DIY set up, however they don’t have the identical longevity and elegance for a big pergola constructed to scale properly.
It’s simpler and extra handy to order a pergola and have all of the provides shipped to you (and the elements are normally pre-finished which can prevent a ton of time!) so if you could find a pergola package that matches your wants, it may be a very good possibility, particularly should you’re not but assured together with your building expertise.
Wooden Pergola DIY Kits
If you happen to’re desirous about constructing a pergola from a package, listed below are some highly-rated choices we like that you could purchase on-line and have shipped to your door.

Can I construct a pergola with 4×4 or 6×6 posts?
The usage of 4-inch posts is barely really helpful for a really small pergola with 4-6 ft between posts. They simply can’t stand up to the identical weight and wind sturdiness as a 6×6 (or 8×8 like I used) pergola body. Sure, you’ll pay extra for a 6-inch publish or an 8-inch publish, however the added energy is value it — and you’ll have a bigger span between posts which implies you’ll want fewer posts.
If you wish to avoid wasting cash on pergola posts, see learn how to make your personal posts from deck lumber.
May I add shade material to the pergola to dam extra daylight?
Sure, if you wish to have deeper shade within the pergola, you may add shade material above the rafters. Heather added display above the lattice on prime of her pergola, which can possible be extra climate resistant than material.
Relying on the body of the pergola, you may additionally use this price range trick so as to add shade sails produced from painter’s drop cloths.
PIN IMAGE
Cassity Kmetzsch began Remodelaholic after graduating from Utah State College with a level in Inside Design. Remodelaholic is the place to share her love for knocking out partitions, and constructing all the pieces again up once more to not solely add operate however magnificence to her dwelling. Collectively together with her husband Justin, they’ve reworked 6 houses and are engaged on a seventh. She is a mom of 4 superb ladies. Making a home a house is her favourite passion.
Associated
[ad_2]