
[ad_1]
Posted On August 11, 2023
Intermediate / Superior
How To:
Body Stained Glass Panels utilizing Zinc Got here

“Got here” is a channel produced from quite a lot of metals and is out there in numerous shapes. The 2 mostly used metals used to fabricate got here are lead and zinc. We supply a number of sizes of each Zinc Got here and Lead Got here on our web site.
Zinc Got here is out there in several widths. The wider the width, the stronger it’s. Zinc Got here is inflexible and could be a problem to chop. It lends itself properly to geometric shapes. When used as a border for a stained glass panel, it should present a pleasant clear, sturdy edge to that panel. Select a width based mostly on the look of your piece in addition to the scale.
“U” Got here / Capping Got here is simpler to work with however has little energy.
Supplies & Instruments Wanted:
- Your Stained Glass Panel
- Your alternative of Zinc Got here
- Your alternative of hangers (we present Useful Hangers on this tutorial)
- Ceiling Tile or equal warmth resistant work floor
- Push Pins (Straight Edges – Elective)
- Sharpie
- Ruler / Measuring Instrument
- Nice toothed Hack Noticed or Got here Noticed (Miter Field – Elective)
- Steel File
- (Masking or Electrical Tape – Elective)
- Soldering Iron, Stand, and Damp Sponge
- 60/40 Solder
- Flux and Flux Brush
Observe: Click on on pictures to view them bigger!
Observe: Steps is not going to all the time occur so as, particularly measuring and chopping. You can be going backwards and forwards!
Measuring the Got here:
Lower a brief piece (1” to 2”) of your Got here to make use of as a marking gauge. Lay it over one other piece of got here (each items are laying on their facet as if they have been on a completed piece!) and mark the width of the gauge (each side) onto the gauge got here. Draw a diagonal from nook to nook of those marks. This gives you a forty five° line to chop on.
 Making an correct mitered edge
Place a size of got here on the underside fringe of your panel. Place your mitered gauge subsequent to it so the top of the middle channel traces up with the top of the glass panel. Mark the 45° angle onto the body got here piece.

Utilizing gauge got here to measure and mark body got here After chopping, you’ll be able to see the middle channel traces up with the top of the glass panel
Chopping the Got here:
Observe: In spite of everything this, you could discover {that a} Miter Field will simplify this course of!

Place the blade of your noticed over the minimize line and noticed straight down. Let the noticed blade do the work, don’t drive the minimize. Lower all sides and make allowances for hangers.
Gown every minimize with a file to take away any burrs and to nice tune the angle that you simply minimize.
 Submitting the got here
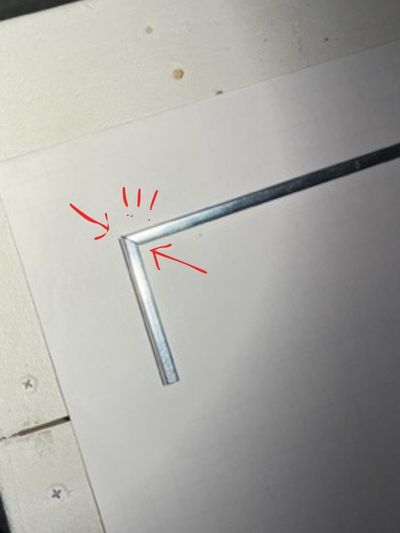 Have a look at that fantastically fitted mitered edge!
Hangers, Half 1:
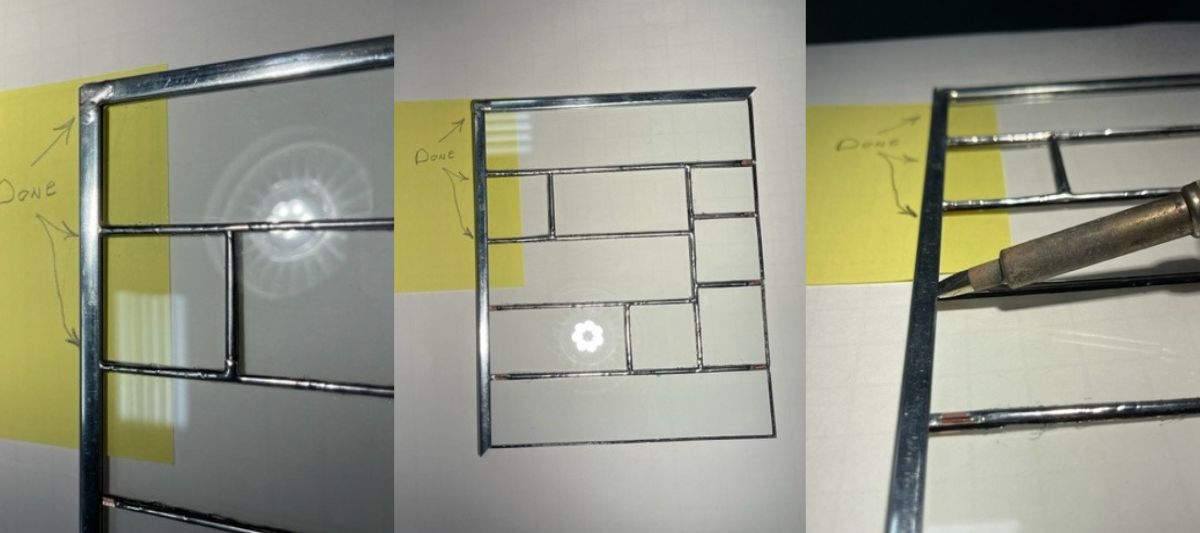
Plan forward for what sort of hanger you’ll use. We advocate Useful Hangers, which require a tiny modification to the highest piece of zinc got here. See the three-step photograph beneath that reveals a small notch filed off the highest piece. When dry-fit collectively, the Useful Hanger will slide down into the facet piece of zinc by that notch (notice that it’s proven flat within the second image, and is then rotated sideways within the third photograph to suit into the facet.)  Making room for a Useful Hanger
Soldering the Zinc Got here Body:
NOTE: Soldering Zinc requires extra warmth than copper foil.
Dry match the edges to your stained glass panel and safe in place with pins.
 (Popsicle Sticks can be utilized as shims underneath the glass, if tipping is observed.)
NOTE: Tape can be utilized to regulate/comprise the solder. (If used, the tape should be caught to the zinc previous to the flux utility.)
NOTE: Flux must be utilized 1 joint at a time for finest outcomes.
Facet 1 :
Solder every edge joint (all which might be touching the facet of the zinc got here), working all the best way across the 4 sides till the entire intersecting joints are soldered to the zinc got here.
Hangers, Half 2 :
If utilizing Useful Hangers, tin them and slide them into the notch you created. If utilizing one other hanging methodology, both make or put together (modify) the hangers to suit into the vertical zinc channels. Tin the hangers and place them into the channels. They are going to be soldered in place concurrently the corners are accomplished.
Corners :
Apply a small quantity of solder, utilizing the chisel fringe of the soldering iron, straight over the nook seam. Hold making use of small quantities of solder on this method till you see that it has penetrated the seam.
 Particulars of angled soldering iron and completed and unfinished joints
Facet 2 :
Fastidiously flip your panel and repeat the identical course of as Facet 1.
Ending :
Clear the panel completely. If wanted, oooo Metal Wool can be utilized on the Zinc Got here to brighten it or take away oxidation brought on by the flux.
For those who Patina your panel, your finest outcomes will probably be achieved through the use of “JAX” Pewter Black.

Wax and dangle. Cleaners and Sharpening (stainedglassexpress.com)
Observe: Accomplished panels may be heavy. Use a series or cable that may simply help its weight.
Sources:
Every thing Stained Glass – Molly Frances
Ezine Articles – Maurine Summy
Residing Solar Glass – Samantha Calder
James A Veilleux
Researched, Interpreted and Organized By: James A Veilleux
04/05/2023
[ad_2]